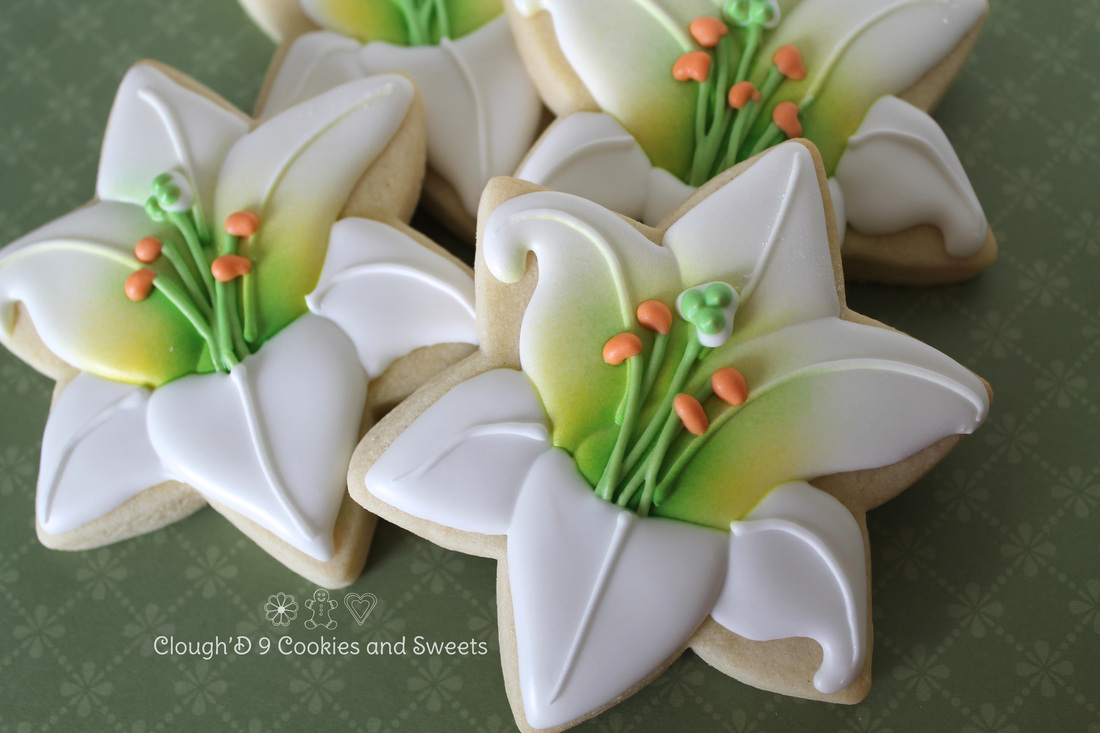
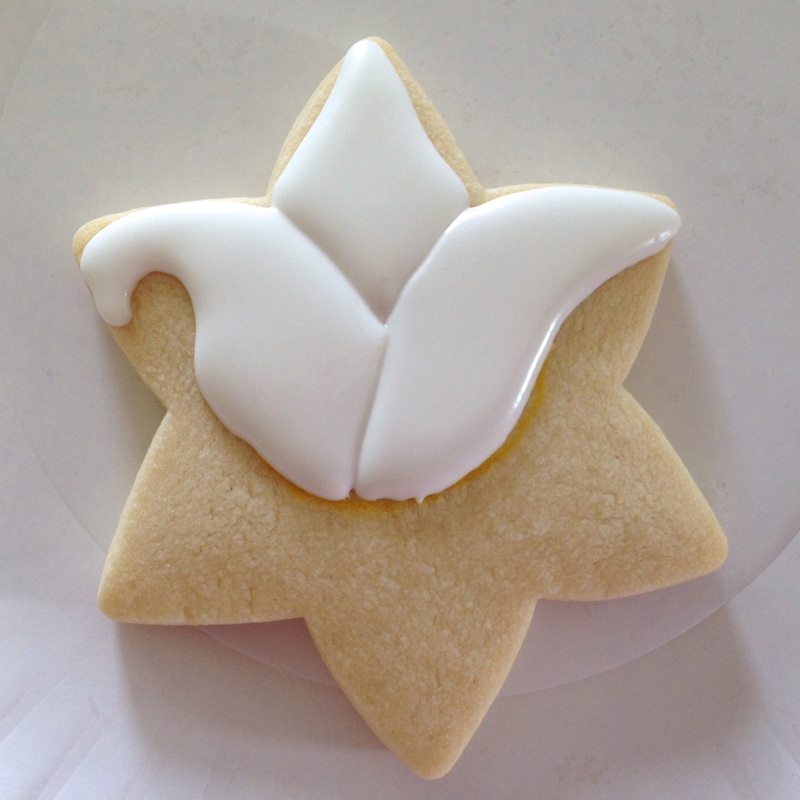
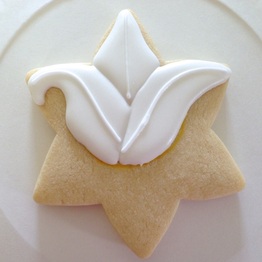
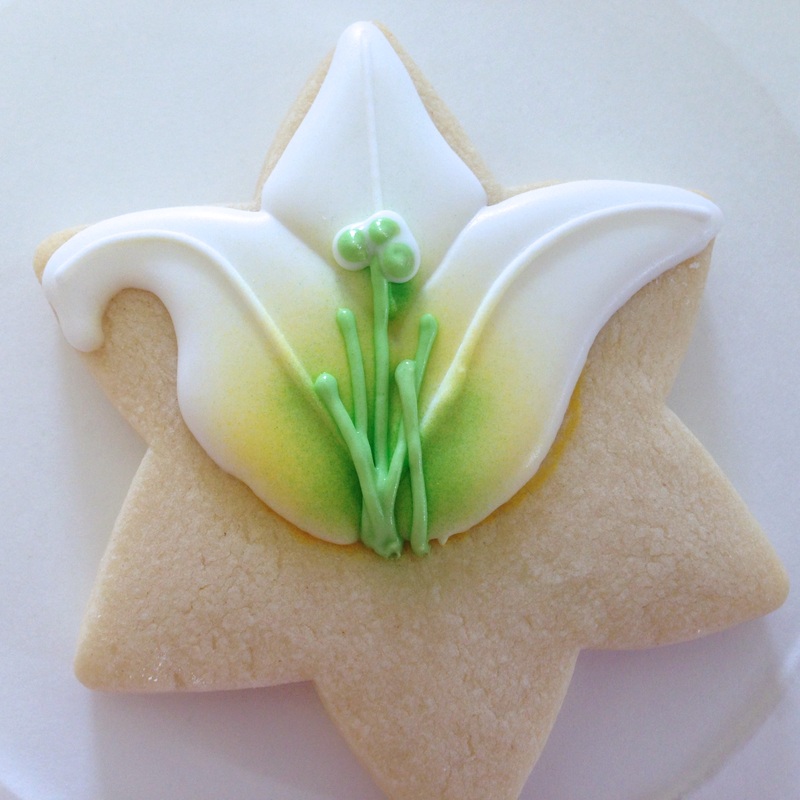
 One of my favorite spring/early summer blooms are lilies. Take a look at how I made these beautiful flowers! I used a 6-pointed star cutter for my lily shape. A 6-petal flower shape could work too! 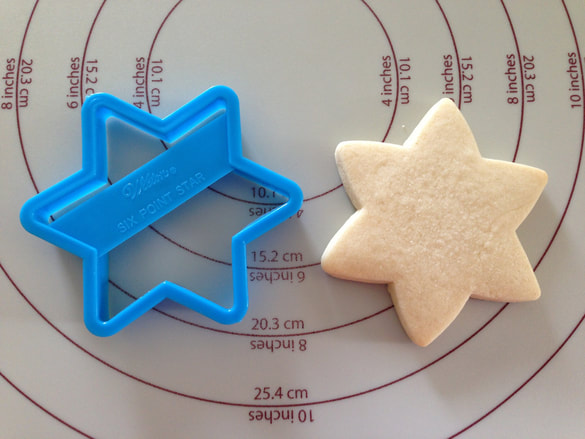 Use an edible marker or a toothpick to mark a curve. This curve represents where the petals closer to you will curve downward. 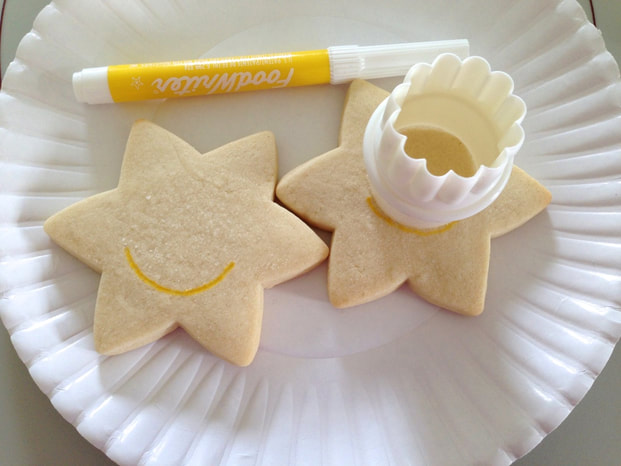 I used 20+ second icing to pipe the petals. I allowed each petal to dry a few minutes before piping the adjoining petal.
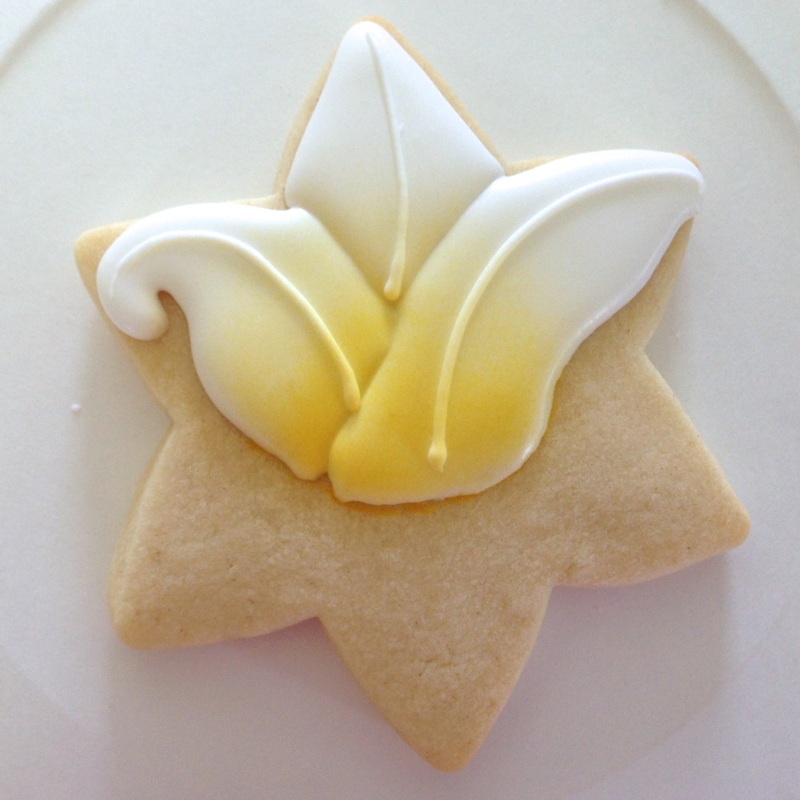
Use piping consistency to pipe the flower vein on each petal. I used my airbrush to add some color, yellow followed by green.
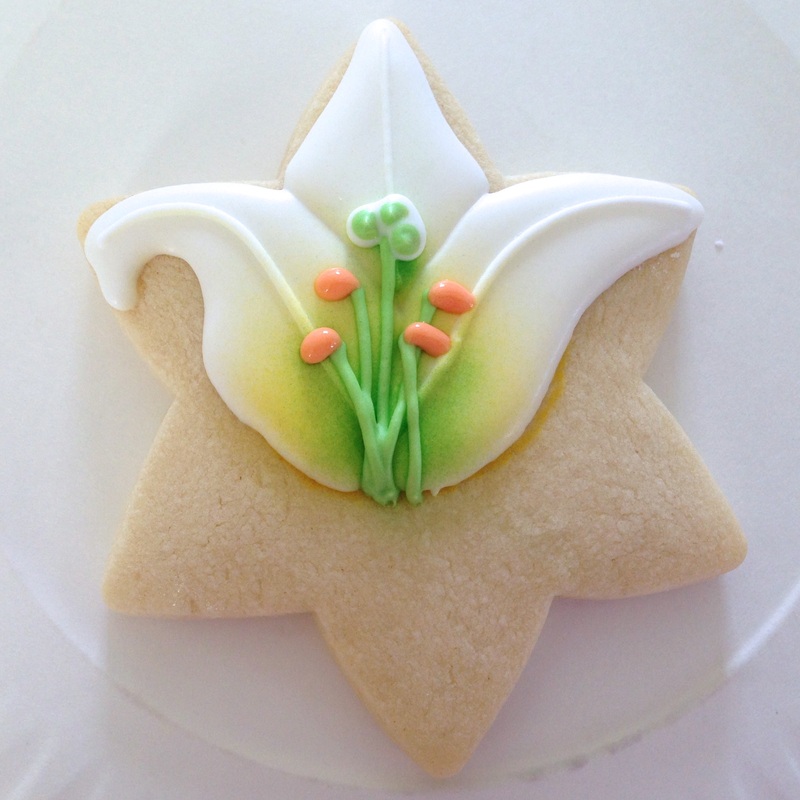
Pipe the parts found in the center of the flower.
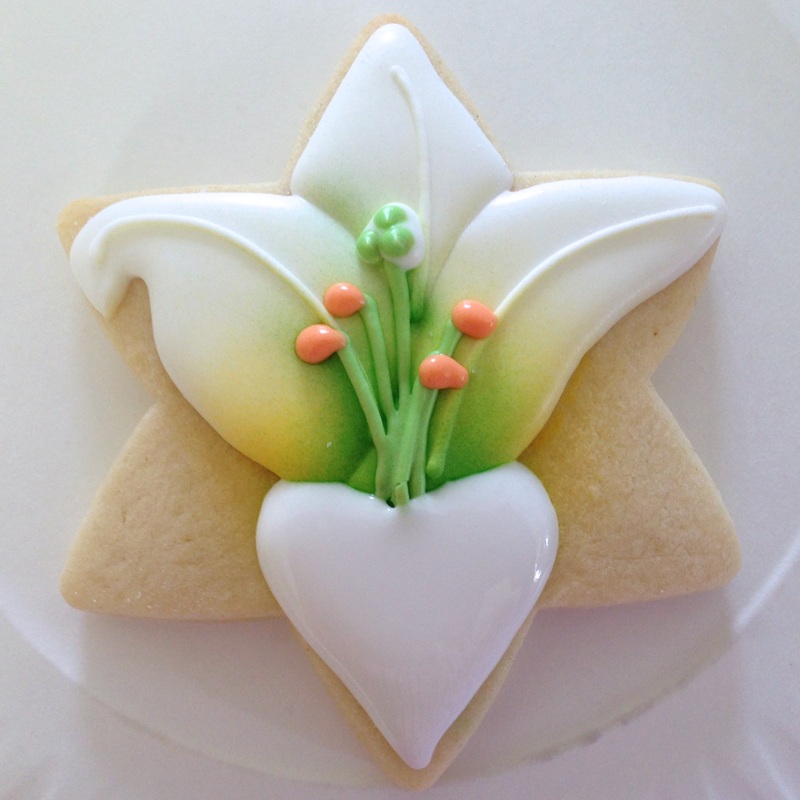
Finish the petals! Remember to let the petal dry a bit before adding the neighboring petal.
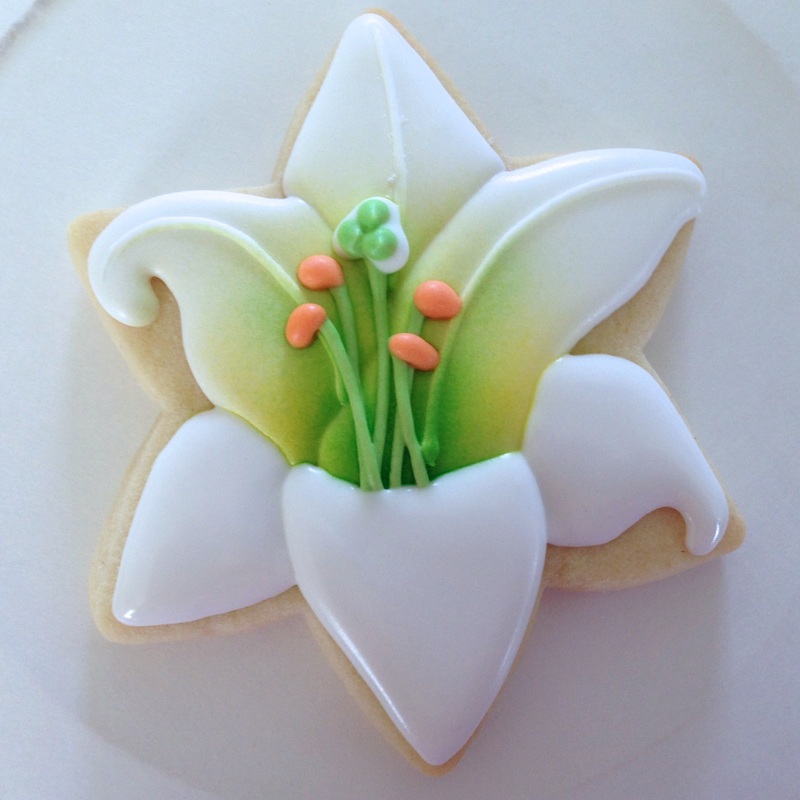
Finish the lily by adding the remaining petal veins. 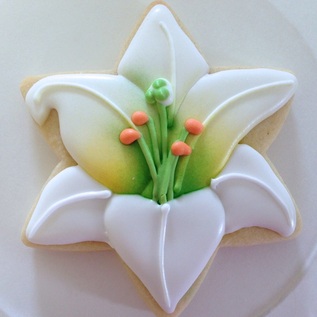 Pair these pretty lilies with some speckled eggs for an Easter celebration!  Or make some other lily varieties by changing up the color, like these Stargazer Lilies! 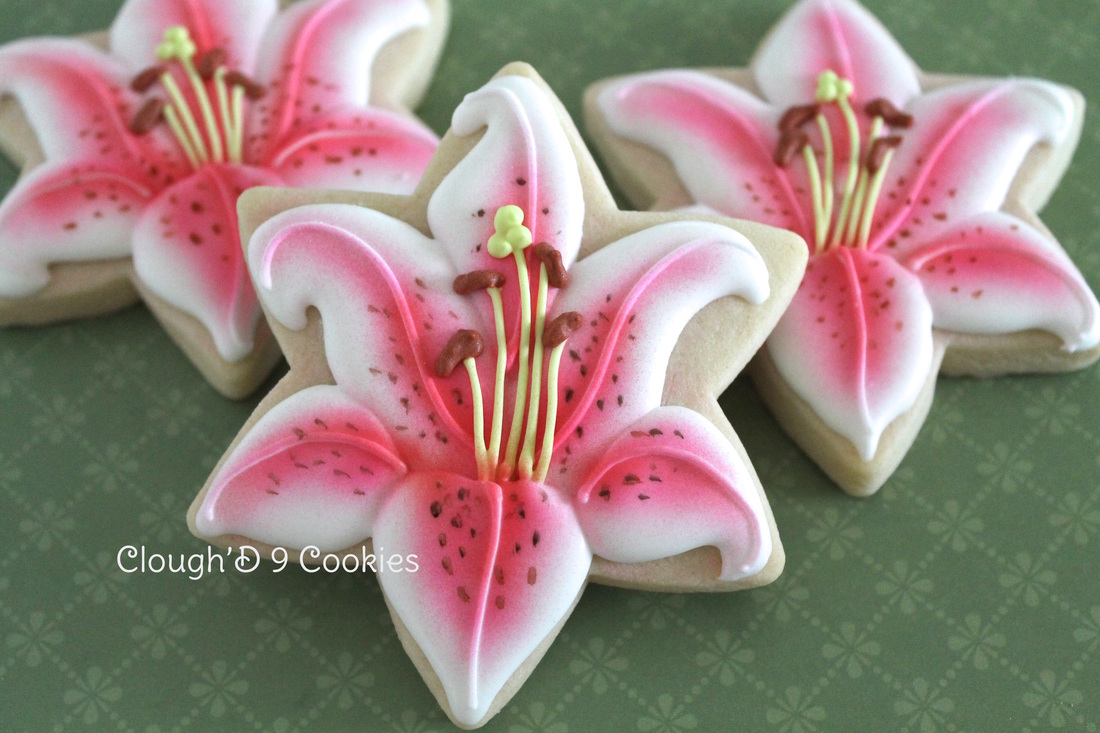 Need a lily cutter? Grab one here from Sinful Cutters!
sinfulcutters.com/shop/ols/products/lily-flower-cookie-cutter-fondant-cutter-clay-cutter-by-cloughd-9-cookies Got a 3D printer and want the stl file? Grab the file here! https://www.cloughd9cookies.com/store/p136/Lily_Flower_STL_Cutter_File.html
Belle Harris
3/3/2015 04:44:51 pm
These are amazing!! I didn't even notice they were on a star cutter! And the stargazer ones are perfect!!
Amy Clough'D 9
3/9/2015 02:38:38 pm
Thanks, Belle! That 6-point star is SO versatile! It makes a great snowflake too!
Amy Clough'D 9
3/9/2015 02:39:27 pm
Thanks for visiting!
Sarah
3/4/2015 01:00:31 am
I love these! And using the star cutter is genius, so much faster than hand cutting and much less fragile. I will definitely be making some of these!
Amy Clough'D 9
3/9/2015 02:40:25 pm
Oh most definitely! I try to avoid hand-cutting at all costs! 3/5/2015 08:06:24 am
Amy, these are gorgeous!!! Thanks for the tutorial!! I'm going to try your technique the next time I do daylilies. They are a similar flower to lilium and I think it might work. Last summer I tried to figure out how you got the depth. Tried a few things but never thought of the sequence you used!! Big hugs from me!!!! You do awesome work!! Love the fact that you are willing to share!! --Katy
Amy Clough'D 9
3/9/2015 02:41:37 pm
Thank you Katy! I love being able to break down the steps to share them. I would love to see your liliums!!
kathy Pilato
3/9/2015 03:49:54 am
and that, my dear, is why I love you! Sweet inspirations and sweet person, all wrapped up in a cute little package! Hmmmm, did you use a parchment cone :)?
Amy Clough'D 9
3/9/2015 02:42:11 pm
Awww Kathy!!! Big hugs to you!! Can't wait to see you at CC!!
Joan
3/9/2015 04:53:50 am
I just ordered this cutter from Karen's Cookies just so I could try these. I'm new to airbrushing so fingers crossed I get them even close to what yours look like. I'm a big fan of yours. Love your work. Thanks for such a great tutorial...again!!!
Amy Clough'D 9
3/9/2015 02:44:10 pm
Thanks, Joan! That 6-point start is so versatile- I use it for snowflakes too! Don't be afraid of that airbrush. It's one of my favorite tools. Getting a handle on the trigger control is the biggest hurdle. Practice on blank paper or on coloring book pages. You'll be airbrushing everything in no time! 3/9/2015 07:50:07 am
The lily has never been my favorite flower but I sure am loving it now! Would you mind if I made these as well? I live in Texas, which is a loooong way from where you are! I want to show them off on my FB page and I would be glad to state that you are the originator...I just want to make these! Thanks, Mollie Wilson
Amy Clough'D 9
3/9/2015 02:45:28 pm
Of course you may make them, Mollie!! That's why I have the tutorial :) And please link back to me- I'd love to see what you did!!
Loretta - Sweet Southern Cookies
3/9/2015 08:15:31 am
These lilies are gorgeous! Your so sweet to share how you create your gorgeous work
Amy Clough'D 9
3/9/2015 02:46:25 pm
Thank you so much, Loretta!! I hope to hear your sweet voice this year at CC!
Reva E. Lupin
3/10/2015 05:25:21 pm
See, everyone loves these!!!
Dana
3/12/2015 03:30:17 pm
Hi Amy! I think your Easter lily & Stargazer lily cookies are so beautiful! Thank you for your tutorial on how to create these beautiful blooms! A Tiger lily would be a great option also! I have a rusty 6 point star cookie cutter thats about 3 inches across from point to point. I would like to replace it. Will you share with me, the measurement of your Wilton star cookie cutter? Thanks so much!
Amy Clough'D 9
3/14/2015 12:00:40 am
It's 3 5/8" from point to point. Thank you for your sweet comments! I can't wait for my lilies to bloom in my yard!
Dana
3/14/2015 04:03:41 am
Thank you Amy, for your reply! I'm sure I can find a cutter the same size! Again your liliy cookies are beautiful! I just purchased my first airbrush, and my daughter, who has used an airbrush to decorate cakes, is going to teach me how to use it. Your lily cookie design, will provide the perfect canvas for my airbrushing lessons. Have a wonderful day!
marsha
3/19/2015 06:28:35 am
Absolutely beautiful. You are the cookie queen. I have just started to decorate cup cakes and cookies, not as well as you but am practicing.Thank you so much for the tutorial. Am going to give these a try.
Suzy
3/23/2015 04:12:48 pm
Absolutely beautiful! Thanks for sharing! I will give them a try. A great project to practice airbrushing...! Thanks again.
Adriana
4/15/2015 02:57:45 pm
Thank you for sharing!!!! All of your cookies are beautiful. Would you share how to get the icing to not have any bubbles? The bubbles drive me crazy!! Thanks again for sharing your awesome craft.
Amy Clough'D 9
4/25/2015 09:03:14 am
Bubbles are the such a pain! I have found that the thinner the icing, the more bubbles there are. So I have adjusted my floods to about a 12-14 second count. Also, let your icing sit for a few minutes before you fill your bags or bottles to allow the bubbles to rise to the surface. As far as popping those pesky things, check out my blog post: http://www.cloughd9cookies.com/home/kiss-those-air-bubbles-goodbye Good luck!
Barbara
4/24/2015 05:44:18 am
These are gorgeous! I have an actual lily cutter that I'd like to modify this and try, if that's okay with you? If they turn out and I post them, I will most definitely give you credit! Thank you for sharing your creative genius!!
Amy CloughD 9
4/25/2015 09:05:05 am
You most certainly try them out! I love it when I inspire others to try out my tutorials! Have fun! :)
Barbara
4/27/2015 03:23:11 am
Thanks so much, Amy! I hope they turn out.....Happy Cookie-ing!!
Lynda
5/4/2015 10:54:43 pm
I am in the process of trying these lilies!!!! I am going straight for the stargazers as they are my sister's favorite flower. I am hoping that I am successful on the airbrushing part!!!! Thanks ever so much for sharing the tutorial!!
Amy CloughD9
5/6/2015 12:49:41 am
Remember to start off easy with the airbrush color. You can always add more! Good luck, Lynda!
Nanna Niki
5/5/2015 03:59:01 am
Beautiful! The stargazer is my favorite flower. How did you do the dots on the stargazer?
Amy CloughD9
5/6/2015 12:50:30 am
The dots are painted on with a brush and gel color. You could easily use a brown edible marker too!
Misty
5/5/2015 01:43:14 pm
Hi. What tip did you use for the Lilly cookies. You didn't mention in tutorial
Amy CloughD9
5/6/2015 12:51:53 am
All of the piping is done with a round tip. The petals are with an old Wilton 3 (new Wilton 2) or PME 2.5. The stamens are with a Wilton 1 or PME equivalent.
Lynn Lipson
5/10/2015 05:36:36 am
How do you pipe the petals? I saw you said you used a PME 25 or wilton 2 or 3. Do you pipe the outline then flood it?
Amy CloughD9
5/10/2015 12:20:52 pm
Yes, pipe the outline, then flood.
R
3/9/2016 12:44:40 am
I was browsing the internet and I saw your beautiful cookie artwork and had to stop to say GREAT JOB! - wow
Theresa
4/25/2016 10:24:59 pm
Thanks for the fabulous tutorial. I tried the Easter lilies first. My first time with an air brush-they were no where near as perfect as yours, but not bad. ☺
Amy Clough'D 9
4/26/2016 08:39:47 am
Thanks for trying out my lily design! Airbrushing definitely takes practice- keep at it! The spots on the stargazer were handpainted with food color. Simple enough!
Jeanie
7/31/2016 06:07:57 am
I absolutely LOVE these cookies and am so grateful you are willing to share with us by giving this wonderful tutorial. I've been sitting on the fence regarding purchasing an air brush. These cookies have made my decision for me!
Melanie
10/2/2016 01:06:32 am
These are gorgeous! I've been searching all over for a good tutorial on decorating cookies, specifically Lily's. my daughters name is Lily and she turns 1 in February. I have never decorated cookies before but I'm determined to make Lily's for her birthday! Is there another technique I can try, in place of the air brushing? I really can't justify such a purchase for a 1 time cookie decorating event. Also, I clicked on the link you had for your cookie cutter and it says it's password protected? Help!
Amy Clough'D 9
10/2/2016 09:05:55 am
Hi Melanie! I would just leave the lilies white and not worry about any additional color. But beware- you might find that you really enjoy cookie decorating! :) I checked out the link, and Ronee (the gal who makes the cutter) has her shop closed until 10/3. That's why it wasn't working. So you should be good to go tomorrow!
Maria claudete silveira
9/27/2017 12:10:16 pm
gostaria de ter a tradução da receita da massado confeiteiro e a massa do biscoito
Cathlene
2/17/2018 08:15:26 am
Thank-you so much for sharing a tutorial on those amazing stargazing lillies - one of my most favorite flowers. With Easter coming up the white lillies will be wonderful to try 3/14/2018 07:12:19 am
Absolutely stunning! What a phenomenal idea Love! Love! Love!❤️❤️❤️❤️
Rani
3/6/2020 03:01:06 pm
Your cookie design is amazing. It’s takes a beautiful mind to create such eye pleasing delights. Thank you indeed for showing.
Nancy
3/10/2020 07:41:11 pm
What do you mean by 20+ second icing? I haven't heard that term before - but I am new to this.
Amy Clough'D 9 Cookies
3/10/2020 07:52:35 pm
Hi Nancy!
Nancy
3/10/2020 08:17:32 pm
Thank you, Amy, most especially for sending the link to Bearfoot Baker's post. That looks like a time saver and Im always looking for those. Decorating cookies is very new process for me so I really appreciate all the information that folks share so generously.
Marie Mcfadden
10/5/2020 11:01:57 am
what airbrush and color brands do you use? 10/5/2020 12:34:48 pm
Since I've been doing cookies for many years, I've used quite a few brands of airbrush machines and airbrush color. Machines: Duff, Pegasus, Artfully Designed, Creative Cookier, and some cheap-o makeup ones from Amazon. Colors: Amerimist, Creative Cookier, Chefmaster. The biggest thing about owning an airbrush is to keep it clean and maintained. Comments are closed.
|

AuthorI'm Amy. Wife, Mom, former science teacher- and now full time cookie baker on Maryland's Eastern Shore. Pull up a chair and we'll create! I'll bring the coffee- maybe Mike (The Cookie Widower) will make it for us. Categories
All
Archives
May 2021
|


 RSS Feed
Copyright © 2024 Clough'D 9 Cookies *All rights reserved*